console Basics
The dcupl Console helps you to develop, test and explore your dcupl applications. Since dcupl is based on certain standards we are able to visualize and interact with your application data without knowing the specific use case of your application itself.
Check out this video to get a quick peek about its functionality or simply follow the tutorial and experience it yourself.
Get started with dcupl in no time by installing and initializing a dcupl CLI workspace tailored to your needs. Seamlessly connect your local workspace to a dcupl Console Project, and set up the DcuplAppLoader to jumpstart your development journey. Experience the power and ease of dcupl, and watch as it accelerates your data-intensive web application projects.
This tutorial covers the following topics:
- Install and init a dcupl CLI workspace
- Connect your local workspace with a dcupl Console Project
- set up the
DcuplAppLoader
Install the dcupl CLI
You can use the dcupl CLI to create new projects based on different boilerplates and perform various tasks around them like data modelling and project configuration.
Requirements:
- A current version of Node, npm
- We recommended the use of nvm - Node Version Manager to keep your node versions up to date
Open your terminal window and run the following command to install the CLI:
npm i -g @dcupl/cli

dcupl --help
Create a Workspace
The dcupl CLI allows you to initialize various starter projects.
For this quick introduction, choose the "Minimal Setup". It includes a concise dcupl project to help you get started with dcupl, containing a simple model and the corresponding data.
To create your new workspace, run the following command in your terminal:
dcupl init
# Whats your project name? --> your-project-name
# Do you want to start from scratch or a demo application? --> Minimal Setup
You've just created your first local dcupl workspace 🚀
Navigate to your new workspace with cd your-project-name and install the dependencies using npm i.
A quick overview...
- data/* -> your static data sources are placed here.
- models/* -> here are your models. Models describe the entities of your application.
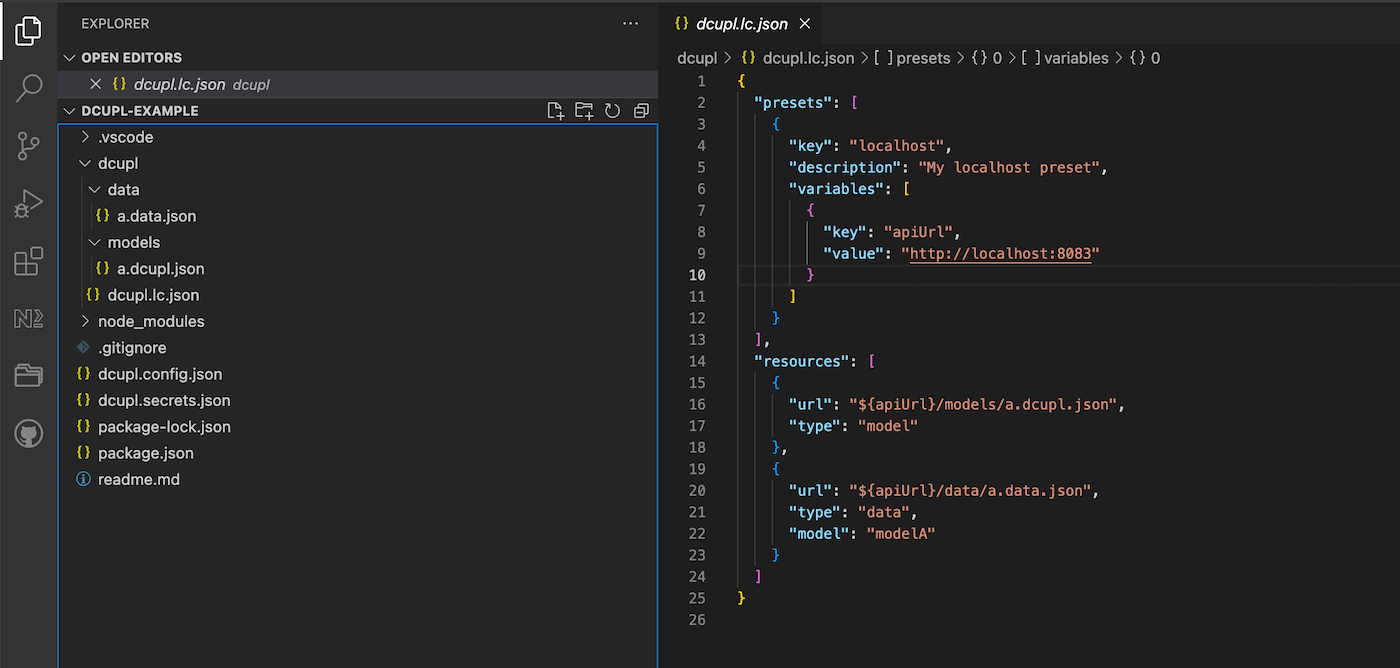
- dcupl.lc.json -> the loader configuration is the description of your application. It's a generic way to jumpstart your applications using the Application Loader.
- dcupl.secrets.json -> contains the apiKey of your project. This file should never leave your local workspace.
- dcupl.config.json -> contains your workspace configuration
In the next step we will create a free dcupl account to connect your local workspace with a dcupl Console project.
Account and project creation
Create a dcupl Console account and a new project. Don't worry, no credit card or personal information - except your email address to register/sign in - is required to complete this introduction and all the tutorials.
Create an account
Go to https://console.dcupl.com/start/register and create your account.

Create a project
After you have registered you can create a new free dcupl project. Since you can create as many as you like 💪, you are already set for the next tutorials and private or enterprise projects.
Choose an appropriate title for your project and move on to the next step - Connecting your local workspace with the Console project.

Join a demo applications
You can also checkout on the projects dashboard our demo applications covering various topics like Fashion Products and Transfermakt data
Connect your workspace to the Console
The following steps connect your local workspace with your dcupl Console project. This step is needed to unlock plan based features and enable advanced debugging capabilities
Configuration
To configure your local workspace you have to set the projectId and apiKey. You find both on the dashboard of your Console project in the "Getting Started Slider".
The corresponding files dcupl.config.json and dcupl.secrets.json are in the root of your local workspace.
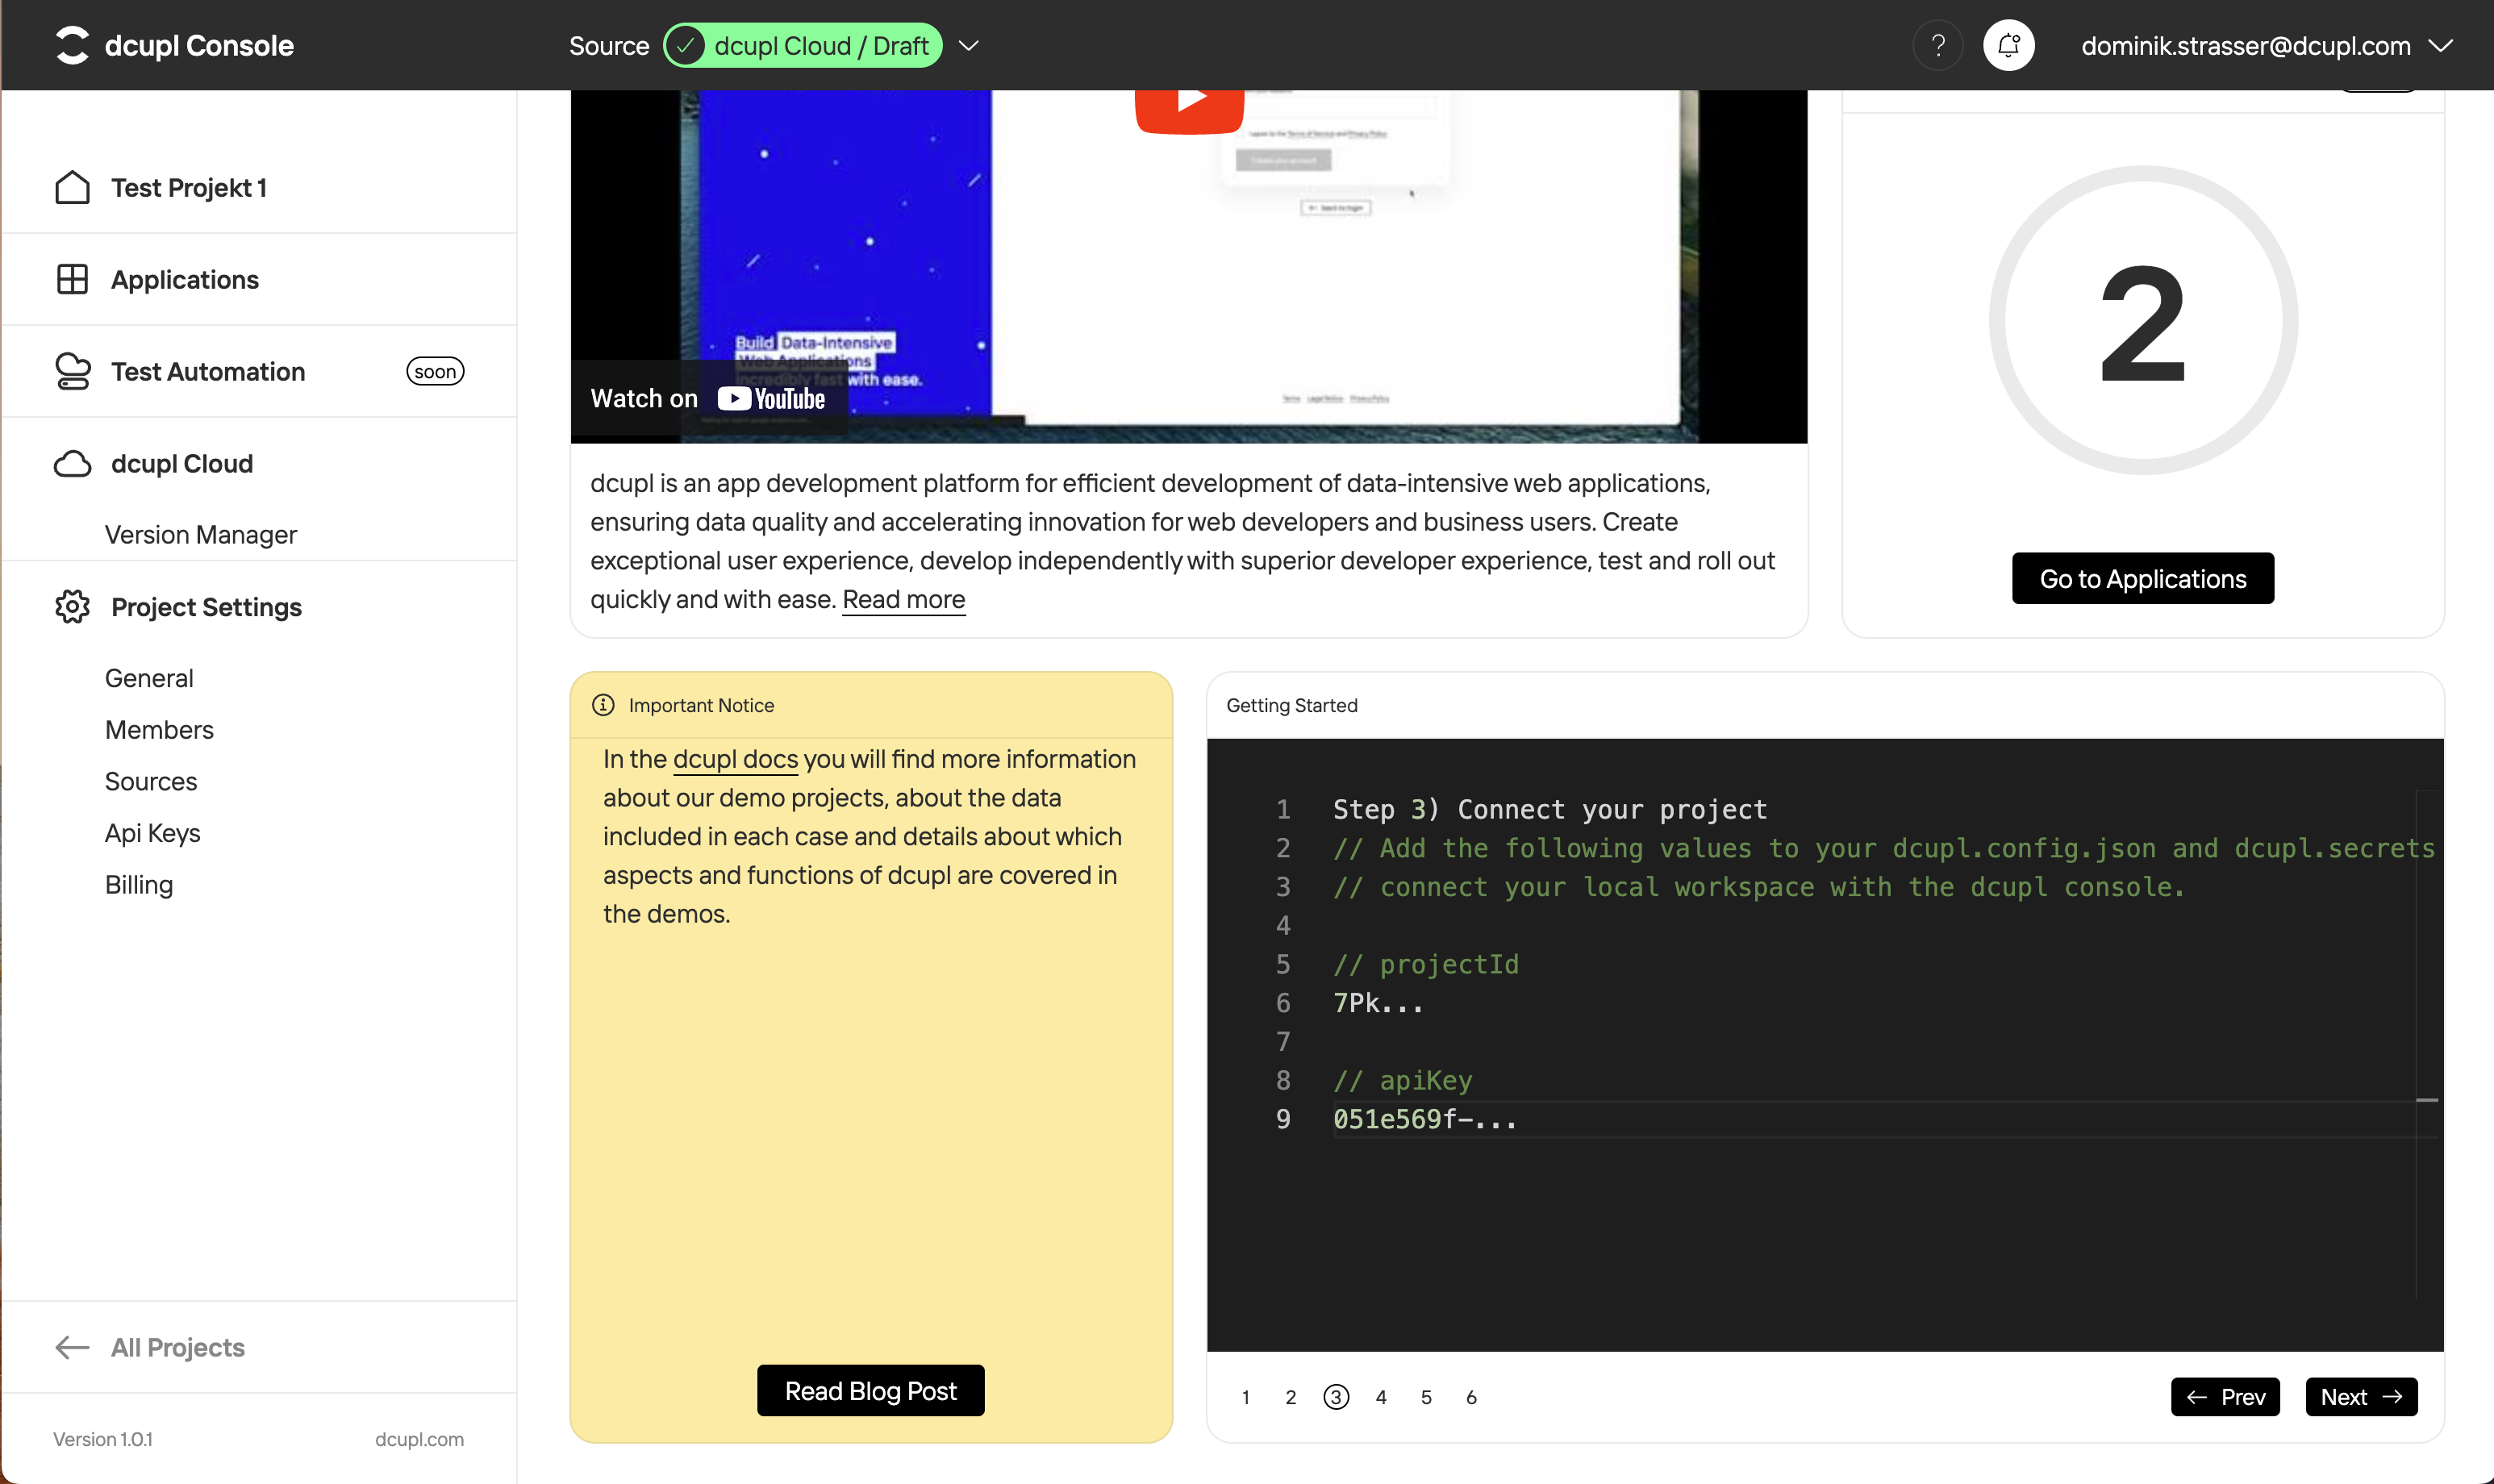
dcupl.config.json -> projectId
{
    "projectId": "VLB...",
    "loaderPath": ...,
}
dcupl.secrets.json -> apiKey
{
  "apiKey": "8d2e5e9a-..."
}
Start your local development server
npm run serve will start your local development server at http://localhost:8083. Reload the dcupl Console. Make sure the source dcupl CLI / Localhost is selected on top in your browser window. Navigate to your Applications in the main navigation and run your app.
npm run serve
Data Explorer
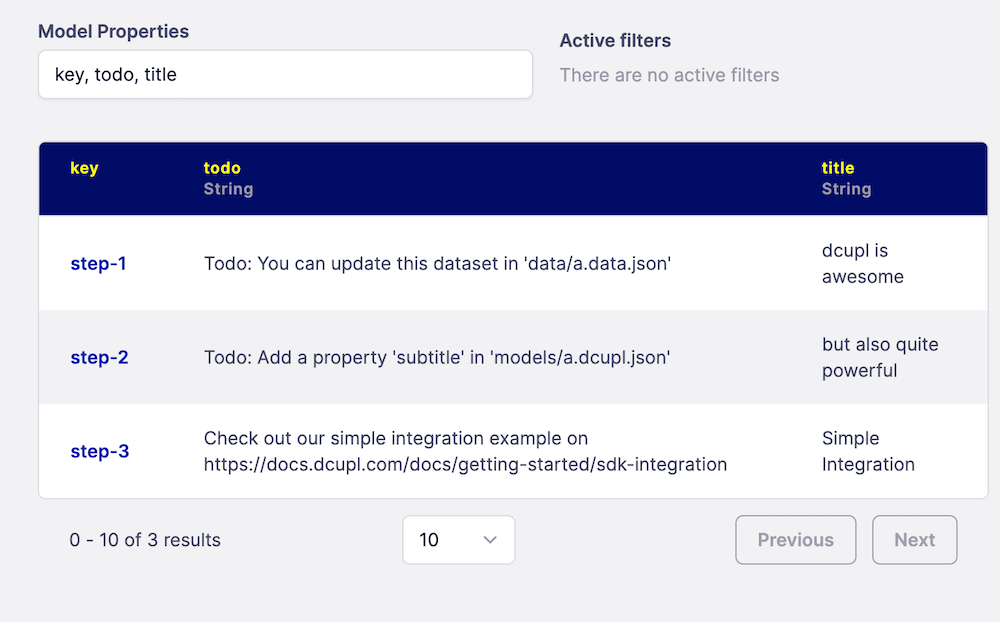
⭐ The Data Explorer is a representation of your application's internal data structure. It enables you to check and review your data way before you even started with your actual application.
The Data Explorer is the most important view in your dcupl Console project. It shows your application according to your loader configuration and the loaded model definitions. You can use this view to validate your data quality and model correctness including all filters, aggregations, etc.

Update data & models
As of now we are ready to explore some core functionality of dcupl. Let`s try some basic changes in the model definitions and the data files to get our feet wet.
Step 1 - update the data
dcupl is able to process JSON and CSV datasets. It does not matter if they are static or fetched via an API.
Open your local workspace in your preferred editor (we recommend Visual Studio Code) and check out the file /dcupl/data/a.data.json.
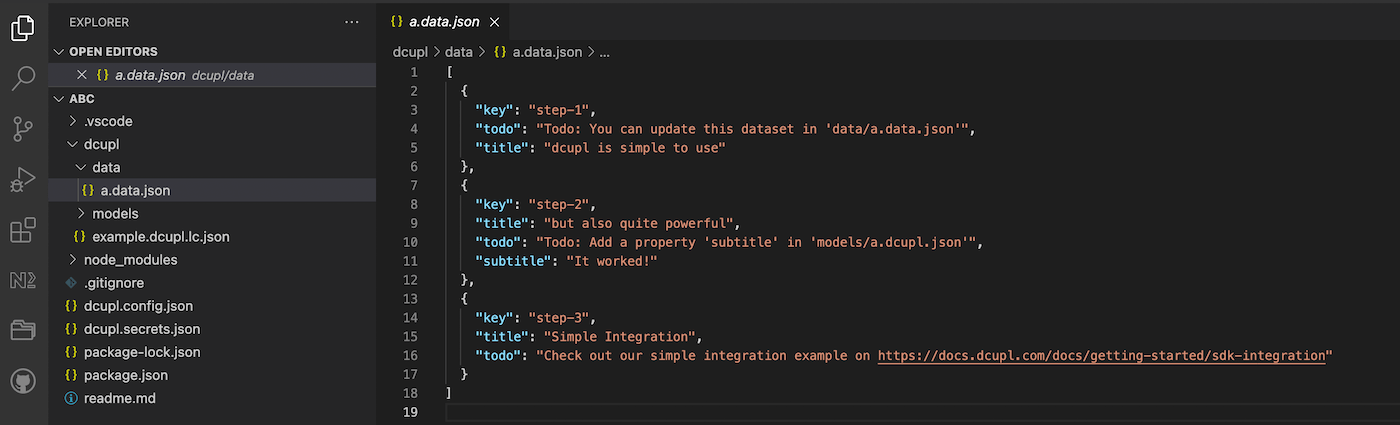
In this setup we are using a simple JSON data structure to describe some todo's.
Any update of this file should be reflected automatically in the Data Explorer. Make sure you have the source dcupl CLI / Localhost selected in the Console.
{
    "key": "step-1",
    "todo": "Todo: You can update this dataset in 'data/a.data.json'",
    "title": "dcupl is awesome"
},
Step 2 - update a model
Initially not all of the data in the JSON resource is shown in the Data Explorer - subtitle is still missing. The reason for that is, that subtitle is not defined as a property for "modelA". Open the file dcupl/models/a.dcupl.json in order to add the new property.
If you use Visual Studio Code you will be supported by some cool autocomplete features.
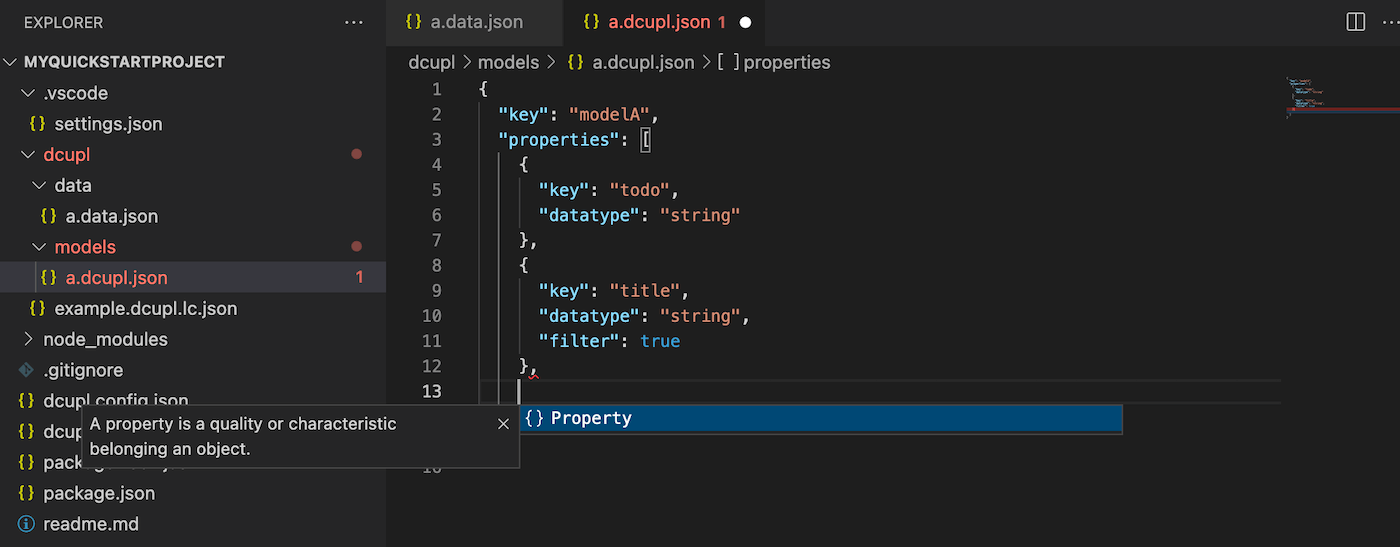
Add the property subtitle and hit save - the new property should now be visible in the Data Explorer.
{
  "key": "modelA",
  "properties": [
    {
      "key": "todo",
      "type": "string"
    },
    {
      "key": "title",
      "type": "string",
      "filter": true
    },
    {
      "key": "subtitle",
      "type": "string"
    }
  ]
}
dcupl combines the model definitions and it's corresponding data sources to create a stable backbone for your application. Only properties, that are defined in your model, are interpreted in dcupl. This makes working with dcupl very easy to understand and very predictable. That's why you only see the subtitle property after declaring it as a property in the model.
Step 3 - Simple integration
In the next step we do a simple integration of your dcupl workspace in an application using our SDK.
SDK Integration
If you are reading this you probably finished the "Getting Started" steps up to this point. We've uploaded a simple example to Stackblitz where you can check out a basic integration of dcupl using the loader configuration.
Whats next?
From here on you have plenty of oportunities to choose from. Continue with one of our other tutorials, check out one of our videos or just browse the docs. Also take a look at our dcupl Console or just chat with us via our website.